Saturday, December 29, 2012

Snow Valley Snowboard Trip!

Nicole and I started off our winter by going to the mountains.  Nicole wanted to hang out in the RV and relax while I hit the slopes for snowboarding.  Here is the trail map.  The top of the mountain was closed, but I had a good time using the #1 lift.


Here I am all suited up!  The RV made it all the way up the mountain with no problems.  We threw the leveling jacks down and slid out the slide out and we were ready to camp out for the day.


Here is the where the parking lot meets the snow.  It started off as a beautiful day!

I took some pictures from the ski lift...

This is mostly the bunny (easy) hill...

Here is a shot of the lodge and a the parking lot behind it.  If you look close enough, you can see the RV in the back of the parking lot...


Here is a shot of the mountains and the lake that sits in the upper center of the pic...


Here is a pic looking down the mountain...

Another one down the mountain...

Here is one of the jumps on the slope...

...Then the clouds came...and then the snow came.  It started off really nice and fun.  Then I started to worry about getting down the mountain with the RV.  So I asked a guy that works ski patrol who had a 30 foot RV there.  He said that I would not need chains until the snow starts sticking to the road.  He said if I stay all day and leave at the time (4:30pm) I planned to leave, it will be most likely that I will need chains on my tires.  So after about an hour of snow fall I decided it was a good time to leave (2pm).  I am so happy I did because there was a lot of traffic going down the mountain.  Once we got to the bottom it turned to rain and the rest of the drive was no problem.  Here is a pic while we were in traffic going down the mountain.


I had a great time snowboarding and Nicole enjoyed her time relaxing in the RV.  Next time we will stay over night and Nicole wants to try to snowboarding.  It was a great way to end our awesome 2012!!!
HAPPY NEW YEAR!!!!!!!!!!

Monday, September 10, 2012

New Awning!

The awning was in need of replacing.  It had holes in in from being rolled up and it was separating from the mounted part to the RV roof.  I found a sweet deal on a new awning online and ordered it.  While it was on order I researched how to replace it.  It didn't seem that hard so I did it!


The first step was to remove the screws that were holding up the ends of the awning.

Here are the screws to one side.


Then remove the bottom of the arms from the RV side.

 Then Nicole and I had to slide the awning out towards the street.  There are no pictures of that because we had our hands full with the heavy awning assembly.

Here is the awning assembly laid down.  I removed the old awning by sliding it out.

Here is the new awning!

I slid the new awning in.

Here is the new awning slid all the way in.

Then we put it back up.  It was tough to retention the spring in the awning, but once I got the hang of it, it was easy to finish.

So new and pretty!


Generator Rebuild

The generator was having a problem handling the load.  In other words, it would run great when I would start it, but as soon as I would turn on the air conditioner or push the slide out, it would turn off.  So I took it to a mechanic to check it out.  He said I may have a bent valve.  I drove home, did some research, and decided to do the work myself.

Here is a picture of the generator with its plastic green cover off.  It also shows the valve cover removed to the right side of the picture.

Here is a close up of what is under the valve cover.  As you can see there is some discolor of the bolt head on the right side, and the left side looks fine.  What that means is that the valve seal is leaking exhaust through the top of the valve and burning the bolt head and the parts around it.  That needed to be repaired.

 The next challenge was figuring out how to remove the generator from the RV to work on it.  I went to "Harbor Freight" tool store and purchased this cool tool.  It is a hydraulic lift table.  My plan was to roll this under the RV, jack it up to the generator, unbolt the generator, then lower the generator and wheel it out from underneath the RV.

Here are the very important 8 bolts holding the generator in the RV.

Here is the lowering of the generator.  The table only went so low, so I had to use the RV jacks to jack up the RV so I could roll out the generator.

 Here is the generator rolled out!

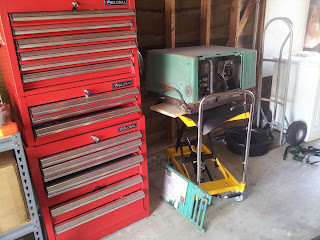
I rolled it right into the garage and took my time to rebuild it.  As you can see the table lifts up so it is easy to work on the generator.

Another picture if the generator's home for about 2 months.

This is the generator with the green cover, exhaust pipe, carburetor, engine head and throttle linkage removed.

 This was the problem.  See the black stuff in the middle... that is deposits built up on the valves and engine head.

 This is the other side of the engine head.  It is the burnt spot that needed to be repaired from the original assumption of the bent valve.

 Here is the same engine head when I just got it back from the machine shop.  They installed new valves and seals and repaired the seats.  Look at the distinct difference in the cleanliness of the rebuilt engine head.

Here is a picture of the other side of the engine head.  No more burnt spot!  It was ready to be put back together with all new gaskets.

Here is the generator put back together.  I wanted to test the generator before spending time installing it back in the RV if it needed more work.  So I extended the wires and the fuel line.  It ran great!

So I installed it back in the RV.  Everything works great!  I used the generator for the slide out on Labor day and I tested the air conditioner with it and it runs great!  I now run it every week for about an hour.

Labor Day Fun!

We decided to enjoy Labor Day at the beach this year.  So we spent the day on Fiesta Island with the RV and 20 of our closest friends!  

We arrived on the island at 6am to get a good spot on the beach.  It is free to stay on the beach all day, but you can not stay over night.  We thought there would be a line to get into the island for the holiday, but we were one of the only 3 other RV;'s on the island at that early time of the day.  It gave us plenty of time to set up and hang out.

Here I am after we set up.

This is the view from the other side.  As you can see we were very close to the water!

I grabbed a good spot with a fire pit that had some extra wood to burn from the previous guests.  You can also see a board with holes in it off to the right side.  That is a fun game that West (Poppy's past RV club friend) built.  Nicole beat me at it!

Ad you can see we had plenty of room in the morning.  Once the afternoon rolled around there were cars and people everywhere!

Another great morning shot of the RV with the fog still in the air.

The fog was burning off and the sun was just peering out of the sky!

Nicole gave me a kite when she went to Florida and we decided to use it for the first time.  It was so windy that it worked great.  It worked so well that we tied it around some wood and let it fly over the RV all day.  That way our friends could find us by telling them to look for the penguin in the sky!

Its a flying penguin!

We love the mobile RV.  Everyone comments on how cool it is!

Two of my friends brought their kayaks and let us use them.  I attempted to take Biscuit out on a trip.

He wasn't as comfortable with it as I thought he may be.

Zoey followed us for a little bit.

Since Biscuit wasn't digging it, I brought him back in and I went out solo.  The little yellow dot on the middle of the pic is me in the kayak.

Then it was Nicole's turn!

 She did awesome!

Here are a few friends hanging out after we ate some cheese burgers that Nicole made.  

Here is the family picture!